
Paint is my oxygen. It breathes life into spaces once dead. Oh, the joy of transforming an entire area without spending a fortune! In the six years we've lived in our house, some of our rooms have been painted four times (eek!). My hubby is not a fan of the process. Unlike me, he doesn't look forward to spending hours pouring over Pottery Barn catalogs and Better Homes and Gardens to find inspiration rooms with just the right colors. He doesn't love the smell of paint or yearn for the long hours of actually applying it to the walls. But he loves me, and he usually tapes the trim and paints that really tough part of the wall at the height of our peaked living room.
My most favorite makeover in our house remains one of our first: the kitchen. I'll admit, it wasn't just paint. We added new flooring and replaced the countertops and light fixtures, but the best part was the paint. We were the proud owners of some dated oak cabinets. The hubby and I had long been fans of white wood and dreamed of having rich, creamy cabinets to meet our taste. While browsing the kitchen cabinet model section at The Home Depot, I spotted the perfect cabinets and thought, "Could we??" So off to the paint counter we went with a cabinet door sample to do a custom color match. Armed with Kilz Stain Killer and our own recipe of a warm vanilla, we set out to conquer the world.... or at least our kitchen.
Kitchen Before:
 |
Notice the paint can on the counter. The cabinets were about to be rescued!
 |
So much wood crying out to be painted!
 |
Ta-Da! Kitchen After:


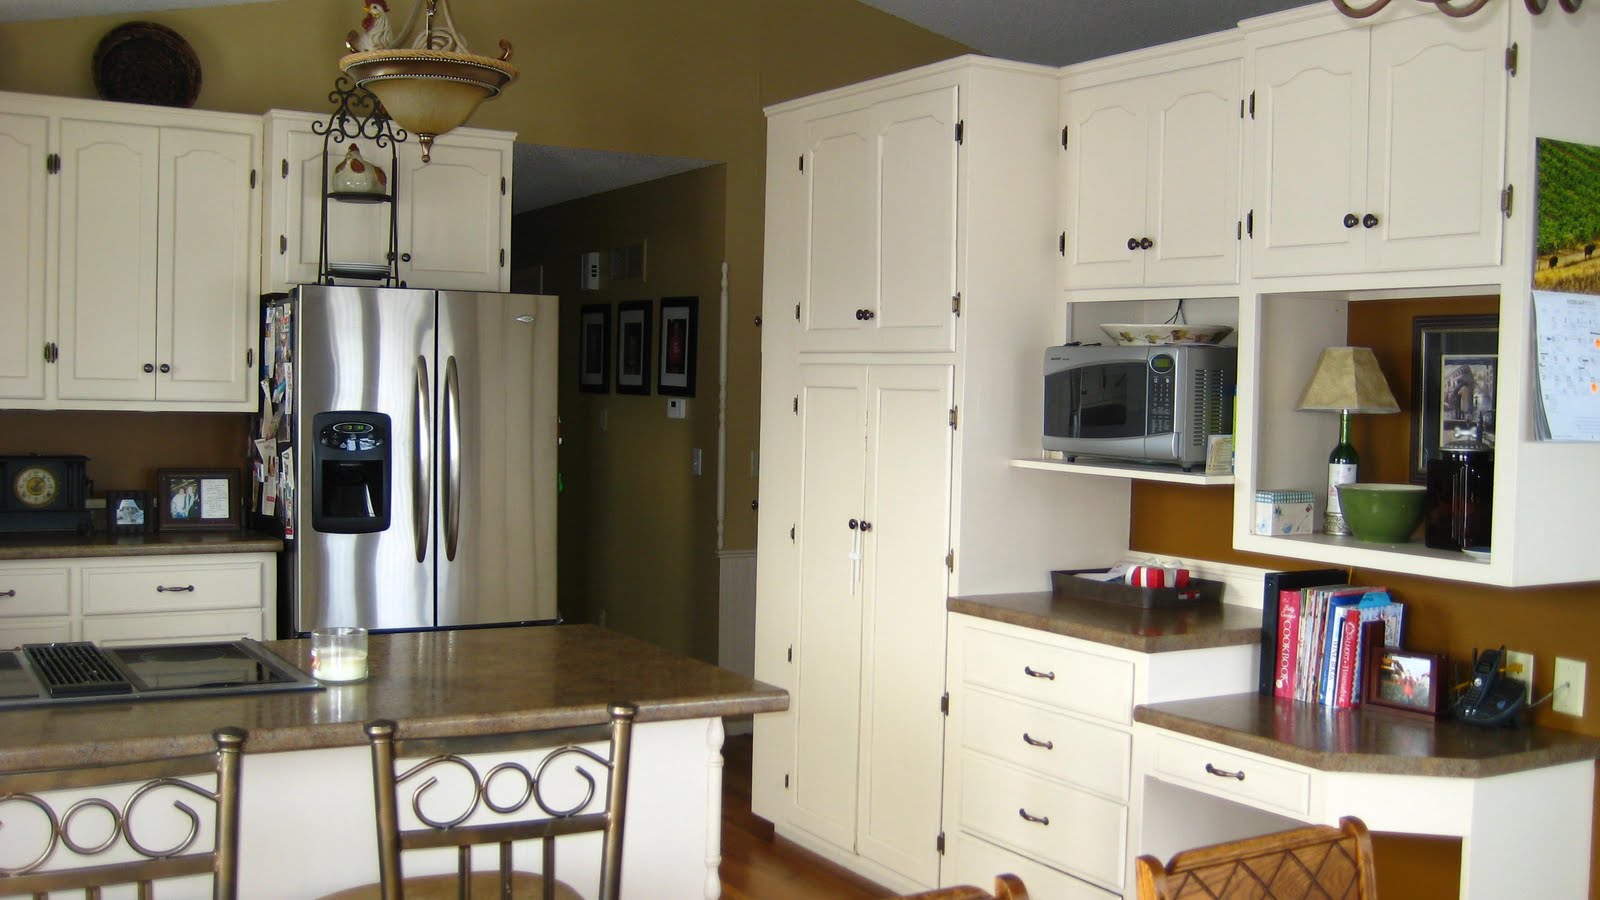


And guess what? It did take an entire weekend to paint our cupboards, but it wasn't all that bad (especially for a paint nut, like me!).
What did we do?
1. The first step in our kitchen cupboard redo was to remove all the cupboard doors and then the hinges and knobs. I wiped all of the wood surfaces to be painted with a damp cloth and laid the doors on the garage floor to make painting them easier. 2. Next, we gave all of the wood a coat of Zinsser stain-killing primer. You want to make sure to use a primer with a stain killer in it to avoid stain seeping through your paint (it's happened to me!). 3. We applied two coats of paint to all the surfaces. 4. After the paint dried, we returned the cabinet doors to their homes and replaced the knobs and drawer pulls with new antique bronze hardware.
Cupboards painted black and updated with silver hardware would really modernize a kitchen space. Here's a look at an amazing transformation with black paint. I'm also fond of green cabinets, but my love put his foot down at that one.
So there you have it. Paint away, my friends.
It looks sooo much nicer! Way to go!
ReplyDeleteThank you! :)
ReplyDeleteBeautiful! I want to do that someday...what is that great wall color? LOVE it!
ReplyDeleteThe yellow/beige color is Rattan by Behr Premium Plus Ultra, and the darker brown under the cabinets is Acorn by Ace. :)
ReplyDeleteDid you do the inside of the cabinets and the shelves? Did you use rollers? What type of paint? It looks great!
ReplyDeleteNice job!!! I've got this linked to my kitchen cabinets project post too today, for inspiration!
ReplyDeleteWow! what a difference! You did a beautiful job!
ReplyDelete