November 7, 2010

Three Girls' Closet: Overcoming a Tragedy and Finding Inspiration in the Ruins

The title of this post is a little dramatic, but so is a room with three girls. I've told you all about how my hubby and I recently decided that all three of our daughters could share a room. Yes, we may be crazy. The oldest two {six and three} have been sharing for awhile now, and they get along very well. They also adore their baby sister {for the time being} and dote on her like little mommas. So right now life is good, and everyone gets along and loves each other and we might as well be singing Kum Ba Yah.


The room the girls share is the old master bedroom; it's a large room with plenty of space, and the girls even have their own bathroom. Even though there's quite a bit of livable space, it's going to get filled up mighty quick with three girls and all of their girl stuff. We need to think carefully about how we're using each inch.  Um, yay!! That means I get another room to organize! With four kids six and under, this momma is all about organization, from laundry to lunch. When your home has order and everyone knows the system, life is a little easier.

I've already told you about how we're planning to maximize the space with two sets of bunk beds. Doing so will free up an enormous amount of room. I also have plans for a great study area in addition to pretty cool places to play.

While it's been fun to think about painting and decorating and adding accessories, this project hasn't escaped some tricky predicaments. Probably the biggest obstacle I've faced so far is how to organize clothes for three girls in one closet. I'm a momma who loves to shop {as in, I categorize it as a sport}, so these dolls have dresses, skirts, jeans, pants, tanks, tees, and sweaters galore. Oh - and don't get me started on their shoe collection. They use one dresser - a chest of drawers - and one large closet. While that may be ample space, it needs to be used very carefully in order to make choosing three outfits everyday, not to mention putting away mountains of laundry, a snap.

I've been thinking and planning and drawing different designs for the girls' closet. My handy husband took my ideas and added his own, and together we came up with a plan to make the closet as user-friendly as possible. He's been spending quite a bit of his free time sawing and drilling and putting together the perfect space for his little ladies. It's not finished yet. I can't wait to reveal it to you when it's done, but for now, I'm going to leave you with this. This is the hurricane that came to be when Louisa first moved into Greta and Frankie's room. If you can't stand clutter and lack of organization, avert your eyes!


I know - scary! I promise to return shortly with a closet space that's much easier on the eyes. It will be pretty and organized - brains and beauty - the perfect combination. 

October 26, 2010

You Are Still Cordially Invited

In case you missed it, I'm having a CAbi Party on Thursday, November 11th at 6:30 PM. Check out all of the details. See the collection of beautiful clothes. Take a peek at my projects; talk to me about yours. Gab with great women. Eat lots of food. It's a girls' night in!


Want to come? Yay!
1. Send me an email at w.design@live.com to let me know who you are {as always, no killers allowed!}.
2. Let me know if you're bringing a friend so I can plan for enough food.

New clothes, fun women, food, and talk of paint - what more could you want?! Hope to see you!

October 25, 2010

A Corny Project? I Don't Think So.

The gurus at Pottery Barn did it again. They sent their Fall Catalog to my home, sucking me right into their perfectly decorated world. I've thumbed through the pages of each and every one of my Pottery Barn catalogs more times than I can count, admiring furniture, room arrangements, paint colors and accessories every time. One particular page that struck me was one that featured a table set for a Thanksgiving feast {or maybe just Tuesday night's dinner} and showcased a beautiful centerpiece with Indian corn and a candle aglow.


Image Via
 I knew this had to sit on our dining room table. It's on, Pottery Barn.

I wasted no time picking up some Indian Corn at a little Farmer's Market {about a dozen ears} and gathered some raffia ribbon and brown ribbon, a large glass candleholder that sits on our patio table all summer, rubber bands, and tape.


With my supplies at hand and my Pottery Barn catalog nearby for a cheat sheet, I placed a rubber band around the candleholder and started adding in ears of corn.


When the entire candleholder had been surrounded with corn, I placed a second rubber band around it for added security.

Next I cut a piece of brown ribbon to fit around the rubber bands and taped it in place. I tied a few pieces of the raffia ribbon over the brown one and called it complete.


Pretty easy! Who's bringing the turkey?

October 21, 2010

Having a Spooky Party? Give Yourself a Hand.

Halloween calls for a party, at least we think so in our home. My husband and I host a Murder Mystery every year when the spooky holiday draws near, and this year is no exception.


Serving a large dinner is always part of the tradition {complete with lots and lots of extra goodies}, and sometimes I like to throw a little something extra into the mix, like a frozen hand.

Don't you think your next party needs a frozen hand? And it's such an easy party trick; just remember to prepare at least a day in advance of your get together. Pick yourself up a couple of disposable gloves {powder free!!} and rubber bands {one per glove}. I usually make two frozen hands just in case something bad happens to one. Nothing bad has ever happened to one of my frozen hands, but I like to be prepared, you know?


Just like with any food prep, rinse the inside of the gloves before filling them with water. And remember - powder free! No one wants to drink punch that has acquired a powdery taste as the night goes on. Fill your gloves with water, leaving just enough room at the base to secure with a rubber band.


Pop your gloves into the freezer and forget about them so you can get back to cooking, baking, and cleaning like a banshee.

On the day of your party, just before guests arrive, remove your frozen hands from the freezer, unwind the rubber bands, and cut the gloves free. I run a bit of warm water over the gloves for a few seconds first to help ease the ice away from the gloves. Plop the hands into a bowl of your favorite red punch - pretty easy!


Have fun, have some punch, and give yourself a hand for adding a fun element to your party.

It's Showtime!

I put my husband to work on a project over the weekend, but I think he was more excited than I was about it. So excited that it was he who suggested we go pick up lumber the next night and summoned his dad {remember my father-in-law, the ninja?} for help right away. That's pretty impressive. Want to know the magic words? "TV" and "Stadium Seating" - that's all it took.

We made a space for a second living room and bar area in our basement when we remodeled a few years ago. While we use our upstairs living room as a gathering spot for family, kids, conversation, and fun, our downstairs living space has always been reserved for watching the big game or family movie night. We had a wonderful entertainment center that my father-in-law built for us, but the room lacked the feel of a real theater. Plus, I wanted to rearrange the furniture. This is what our room looked like before.


A leather couch and loveseat sat perpendicular to each other and positioned around a coffee table -a pretty traditional living room arrangement. Opposite the couch sat the entertainment center.


The idea for stadium seating actually came from an HGTV episode of Design on a Dime, where the designers had a platform built for the lucky family's theater room. I only caught the last few minutes of the show, but that was enough for a lightbulb to go off in my head. I didn't even like how the Design on a Dime room turned out, but I knew the stadium seating idea could work for our space. I Googled "how to build stadium seating" and found the perfect plan. 


My husband was on board with the idea right away, but before we dove in, we had to make sure that we really wanted the room to be a theater room and not a conversational area. Because with the couches placed one behind the other, the conversational vibe would pretty much be killed.  Ten seconds after I brought that up, my husband said, "I'm sure." The second thing to consider about this project was spacing. We positioned the couches in their future spots to ensure that there was enough space between the front seats and the television. There was. Alrighty then; we were on our way.

Following the simple plan we found, my husband and father-in-law constructed a platform with a corner step in just a few hours. Into the basement it went, and after a coat of paint {semi-gloss exterior finish - we wanted something that would be forgiving to spills}, the platform was ready for business. We removed the coffee table and placed the couches in their new homes. For less than $150 {the cost of the building supplies and a quart of paint}, our living room became a home theater.


I've gone a little crazy with the pictures! Did you catch the missing lightbulb over the bar?

This was a really fun project. $150 packed a whole lotta punch. And I'm not finished! I still get to accessorize the sofa table that we stole from our upstairs living room. Right now it's holding a few random items and the books that used to sit under the coffee table, but I get to shop the house or go Goodwill Hunting for something new.


Pass the popcorn, please!


October 18, 2010

Painting a Mirror: So Easy, a Caveman Could Do It

So back in college, when everyone else was involved in tomfoolery {not me, I swear!}, I liked to scout out garage sales and Target for cheap ways to liven up my room in the townhouse I shared with six other girls. Yikes - that's a lot of tomfoolery! I found out how many different arrangements my room allowed with a twin bed, dresser, and TV {exactly two}. I kept my closet in ship shape with clothing hung according to sleeve length and color. And I accessorized as much as I could with the little wall space I had. Two of the best investments I made in decor happened to be for that little room in college. I picked up a Shabby Chic mirror and shelf from Target that originally came painted a sage green. Nine years later, I think I've painted that mirror and shelf at least four times, and they still look great!

The mirror was last red for Lou's nursery:


Stunning! But I needed to take the Lady in Red down and make it work for the girls' new room transformation. The new room's colors will be a mix of Rhino by Behr {Remember? One of the most wonderful colors on Earth?}, a silvery beige, a grayish turquoise, and dark brown. So the Lady in Red will now be the Damsel in Dark Brown. I picked up an 8 oz. trial size of my paint choice at The Home Depot. {Less than five bucks and big enough to paint a few accessories!}


Two coats of paint later, and the mirror was transformed. All this babbling, but here's a useful tip. When you're painting a mirror or any frame on a piece of glass, you don't need to take the time to tape it. You can, of course, but I'm usually either too lazy or too busy keeping four kids alive and well. Instead, I paint away, and after the paint dries, I use an old calling card or a credit card to gently scrape the paint off of the glass. So easy, a caveman could do it!


Here's a sneak peek at the mirror in her new place, waiting for the rest of the room to come together.


As not to feel left out, the same shelf from college also got a couple coats of the same lovely brown. She's waiting anxiously to join her old friend, the mirror, in their new home. Happy painting!

October 17, 2010

You Are Cordially Invited

I'm having a party, and you're invited! Besides painting, decorating, organizing, and creating invitations, announcements, and cards, entertaining friends and family tops my list of most favorite things to do. I go all out for birthday parties, baby and bridal showers, summertime backyard BBQs, and even our annual Murder Mystery with friends. So I'm loving the thought of bringing friends and readers together for an evening of fun, a girls' night in, brought to us by CAbi.


Have you heard of CAbi? CAbi stands for Carol Anderson by Invitation, and it's a different way to shop for clothing. The idea is the same as any other home party, where guests can shop for food, home decor, candles, etc., but CAbi is so great because it's clothing! Yay! The parties work like this. First, our fabulous CAbi consultant, Becky, will show us all the great blouses, sweaters, tees, vests, dresses, skirts, pants, and jeans.


Then, we squeal like girls in college getting ready to go out as we try everything on {In separate rooms, behind closed doors, with the drapes closed, of course - I'm not running a peep show for the neighbors or anything!}. Next, we eat delicious food, drink some wine, give each other tips and tricks for what works and what doesn't and what looks fab and what doesn't quite make the cut. I've been to one of Becky's parties. She is a fashion guru and has all kinds of tricks up her sleeve to make you look hip - even when you're just running to the grocery store for a gallon of milk.


You don't need to commit to buying anything to come to the party. Come. We'll eat, drink, try on clothes, look around the house, see my projects, and talk paint {I think I always manage to talk paint!}. It's a fun way to spend a night with other lovely ladies and possibly score some new clothes!

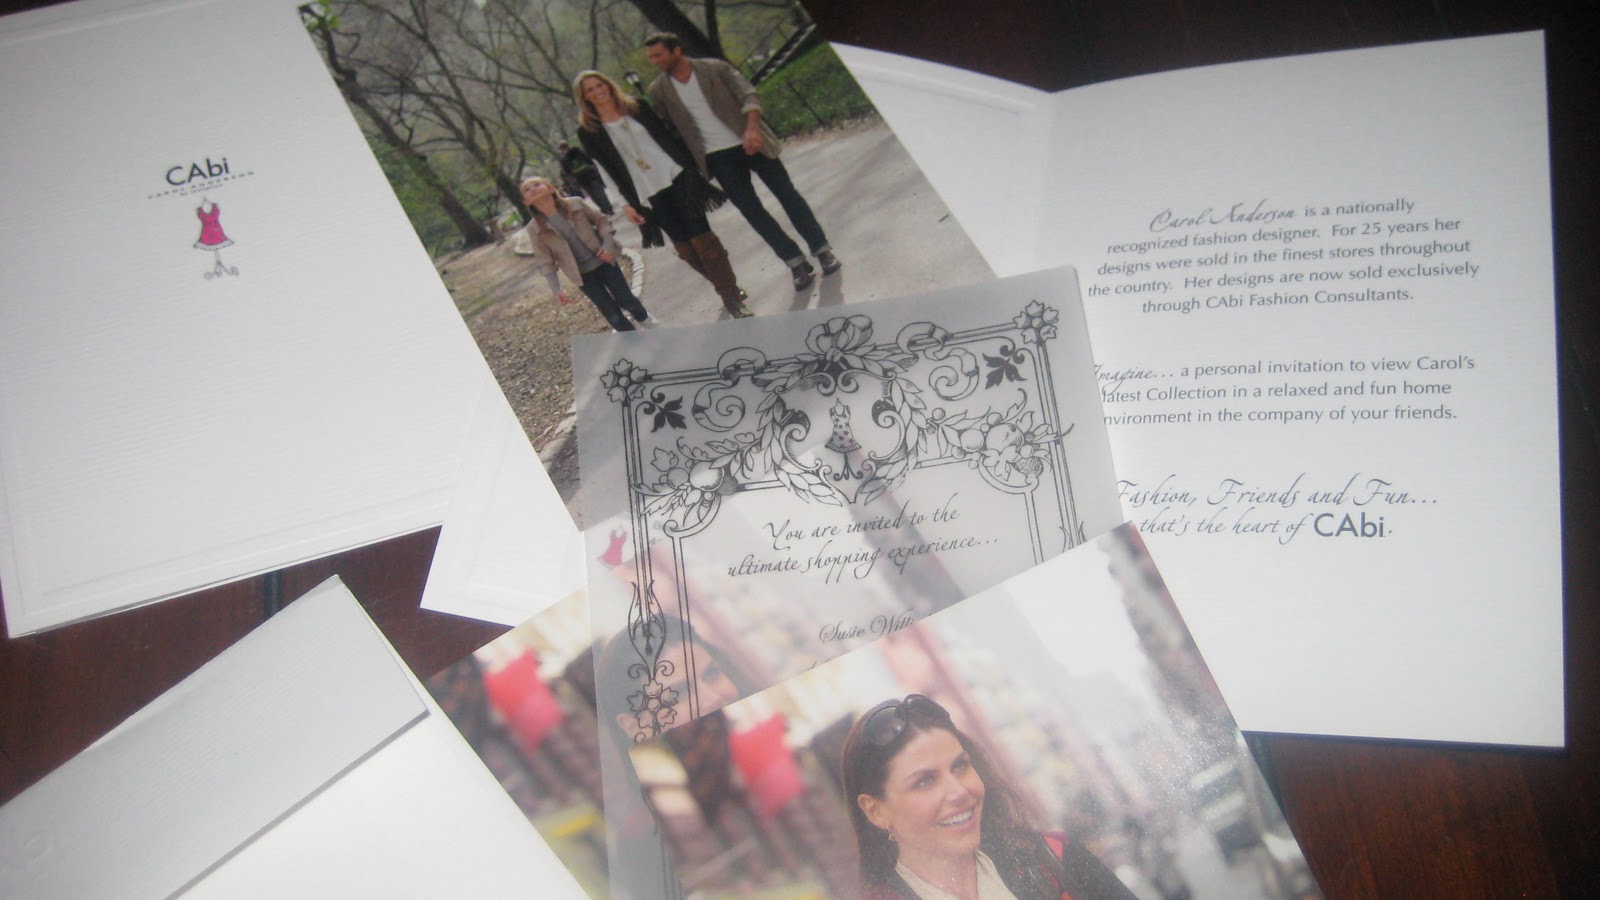
Details!! This bash is taking place on Thursday, November 11th at 6:30 PM at my home. If you live in the Western Wisconsin area and you're interested in coming, email me at w.design@live.com and let me know how I might know you {a mutual friend, a neighbor} so I have peace of mind that you aren't a killer. If I'm friends with you on Facebook, look for an event invitation. And if I see you from time to time, I may just spring one of these on you:


These are, without a doubt, the fanciest home party invites I've ever seen. I thought I must have made quite the impression on Becky when I met her, but it turns out she has these beauties made up for each and every one of her CAbi hostesses.
Want to come? Great!

1. Email me at w.design@live.com to let me know who you are {remember, no killers!}.
2. Let me know if you're bringing a friend so I can make enough food.

New clothes, fun women, food, and talk of paint - what more could you want?! Hope to see you!

P.S. Look forward to tips and tricks of throwing a fabulous party; I have many to share!
Related Posts Plugin for WordPress, Blogger...