November 23, 2010

You Can Be a Little Bit Fancy

Go ahead, it's fun. With Thanksgiving only two days away, I'm well aware of those "big deal" things, like the head count, the pies {apple for me, please}, the bird. Then there are the little things, the ones we could easily overlook while we're yelling at our husbands to get the extra chairs out of the garage, but the ones that make the celebration extra fun and a little fancy. 

During the spring semester of my junior year in college, I was awarded the English Department's book scholarship. I had free reign to buy $50 worth of books at Border's; I simply had to turn in my receipt to the English Department secretary to be reimbursed. After 45 minutes of browsing, I had made my selections and showed my husband {my fiance at the time} what I had decided on.

"The Art of Napkin Folding and Etiquette for Everyday? I'm pretty sure the English Department wants you to buy something like Moby Dick," he told me.

"I don't care. It's my scholarship. I'm still reading, aren't I?"

Needless to say, I didn't receive that award again. But that napkin folding book has brought me plenty of use. When friends come for dinner and my husband spots the napkins transformed into pieces of art, even he can't deny that it was a good buy. So here's a little something fun and fancy to add to your Thanksgiving table this year.


How?

1. Start with a cloth napkin laid flat on the table.
P.S. Iron it first!


2. Fold the bottom of the napkin up to meet the top.


3. Fold the top layer of the napkin down.


4. Fold the top back up to meet the top of the new fold.


5. Carefully flip the napkin over.


6. Fold the right side of the napkin into the center.


7. Fold the left side in to meet the right.


8. Pull back the bottom right side of the napkin and tuck the left snugly inside.


The back of your napkin will look like this:


9. Flip the napkin over and insert silverware.


Easy, and a little bit fancy! The best part? You can set the table and fold the napkins the night before, saving yourself a little extra time for yelling at your husband to get those extra chairs out of the garage tomorrow.

November 21, 2010

Breaking the Rules - Part Two

I recently told you about how I broke the rules and painted on my oldest daughter's walls back in the day when she owned her own room. Since then, those walls have been painted over {twice?}, and Greta now shares a different room with her two little sisters. The girls' whole room has been getting a makeover, first by way of their closet and also from an even bigger project that we've been working on. I've chosen new bedding {but still looking for the perfect sheets!}, planned out a study and craft space, and thought about how the room should feel. My girls love to put on their fanciest dresses, their shiniest shoes, and lots of accessories. They are girly girls, so I think their room should feel that way. And girly to me is youthful and elegant and timeless.

Pearls, silver and gold accents, chandeliers, flowers, and pretty wallpaper all spell girly to me, but there was a problem. When my husband and I moved into our house, we removed wallpaper from no less than six of the rooms. I know some of you have removed wallpaper before. It's a pain. So it's not hard to believe that when we were left with clean white wallpaper-free walls and I suggested that we put up pretty new wallpaper, he looked at me like I was crazy. In fact, he looked at me like I had asked him to eat the wallpaper. "We just spent days taking wallpaper down. And now you want to put more up?" I believe those were the words that left his lips. So I abandoned the wallpaper idea and tucked it away for down the road when he had {hopefully} forgotten about soaking the walls with fabric softener and peeling away pieces of paper bit by bit.

Turns out that six years later he still hasn't forgotten. My husband was no more eager about the wallpaper project now than he was back then. Determined to achieve a vintage wallpaper feel with the girls' room, I did some investigating and found this.

photo from jones design company
This incredibly talented blogger has painted "wallpaper" in her home office. Genius! I was in love, and I was ready. Following the steps from Emily at Jones Design Company, I set out to "wallpaper" the girls' room.


First, I used an old pizza box to cut out a template for the wallpaper design and grabbed a pencil and a small paint brush.


Next, I traced and traced and traced some more.


After I traced the design, I used a small paint brush to paint inside the lines - over and over and over again.


Eventually, the hours of tracing and painting started to pay off as the wallpaper began to take shape.


Lou Lou kept me company during all the tracing.

The only un-wallpapered wall is in between the window on the right and the girls' closet.
That space is being reserved for a chalkboard wall and desk area.


This project took forever. It took so long that I think I started to go a little crazy with all of the tracing and painting and thought my right hand might fall off. But it was well worth it. Frankie calls the walls her "castle walls," and Greta tells me she loves how fancy it is. I love how girly and elegant it turned out, bringing us one step closer to the finished product. Who knew I was such a rule breaker? 


November 17, 2010

The Girls' Closet: Tragedy Overcome

Several big sighs of relief could be heard around here this past week. The girls' big closet project is complete, finally!

What's been happening at our house? First, we removed everything from the closet our three daughters share. With the closet bare, I gave the walls a coat of paint. Closets love paint, too, you know. Next, my wonderful husband pieced the closet back together following a plan suited just for the girls' needs. Then, after carefully going through each item of clothing and deciding what should stay and what should go, I got to put the chosen winners in their new home. And finally, lots and lots of stress was lifted from this momma, knowing that we had a good system in place for three girls' worth of clothing. Yay!

Before I can show you the final product, I think we must go back to the beginning. Remember this?


It was a disaster. See that tower going up the middle of the closet? It served no real purpose and wasted a lot of room. Knowing that space is limited with three girls sharing a room, we wanted to make every inch of the closet work.

Greta, Frankie, and Lou Lou share a dresser containing socks, tights, undies, and PJs. Leaving it out in the room would take away from play and study areas, so we decided to incorporate it into our closet design. We made the dresser the centerpiece with four rods for shirts, pants, dresses, skirts, and dance outfits around it. New shelving for shoes under the bottom clothing rods and at the top of the closet for storage completed the plan.

How did it turn out? The magic lies behind the curtains!

A few years ago, we removed the old clunky closet doors and replaced them
with curtains for easier access to the closet's contents.

Ta Da!

Frankie's clothes hang on top of Greta's, with storage for shoes underneath.

Dance outfits and extra hangers rest above Lou's clothes with more shoe storage below.

The chest of drawers sits in the middle of the closet, serving as both a functional piece
and a place to display prized possessions {plus diapers, wipes, and diaper rash cream!}.


Shoes!


And more shoes!


Now the closet falls under the old "A place for everything, and everything in its place" saying. Plus, with that beautiful paint as a backdrop and a place for pretty things, it boasts function and fashion.

November 16, 2010

Breaking the Rules - Part One

I'm taking a break from the girls' closet makeover, mostly because I didn't get a chance to take pictures of the final product yet.

My oldest daughter, once upon a time, had her own bedroom. Before it was a playroom, before it was Lou Lou's nursery, and before it was a playroom {the first time}, this was Greta's room. It was a vintagey schoolhouse type of room with warm oranges and yellows and reds and pinks.


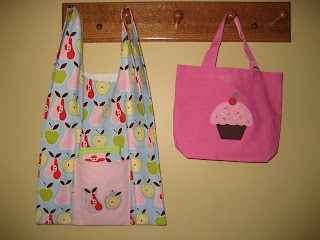
Greta had a bag made from the well known Alexander Henry apple and pear print, and it gave me the perfect inspiration to add some style to her room. But first, let me tell you a little about her. Greta is six, she loves dance and hockey, she wants to be a mommy when she grows up {♥}, and she's definitely a rule follower. So when I asked her if she'd like it if I painted on her walls - as in painted on the paint - she was aghast. "You can't paint things on the wall! You told us not to...EVER!" Well, that's true. I did say that. But I'm breaking my own rule. The worst that could happen, I figured, was that it would look horrible. Then I'd paint over the catastrophe and call it a lesson learned. But hey, at least I would try!
The bag that made me break the rules.


Armed with those oh so handy mini paint samples you've read about here, Greta's bag, and some small paint brushes, I set out to paint on the walls.


I'm no artist, and I was actually surprised at how easy {and fun!} it was to paint on the walls. Since I was painting freehand, I found it very helpful to keep the apple and pear bag right next to me and look at it often. It also helps if you have a cheerleader in the room: "It looks really good Momma! Do another one over there! Are you going to paint 1000 apples and pears?" Well, no. But thank you for your enthusiasm!

So I broke the rules, and Greta got a little charm added to her walls. In the end, she really liked her apples and pears and hopefully learned that it's okay to shake things up once in a while. But she still can't paint on the walls.  

Stay tuned to see what I've been working on in the midst of the closet makeover. I've been breaking the rules in the girls' room makeover, too.
Related Posts Plugin for WordPress, Blogger...